
How to Prevent Nail Lifting with Professional Gels
Table of Contents
- Why Professional Gel Nails Lift: Causes of Gel Nail Lifting
- Proper Nail Plate Preparation for Gel: Step-by-Step
- Curing Time for Professional Builder Gel and UV/LED Lamps
- Chemical Compatibility: Matching Primer, Base, and Builder Gel
- Nail Plate Health Assessment and Client Suitability
- Post-Application Maintenance to Stop Lifting
- Conclusion
- Frequently Asked Questions
Last Updated: September 14, 2026
Why Professional Gel Nails Lift: Causes of Gel Nail Lifting
Nail lifting is the premature separation of a cured gel enhancement from the natural nail plate, and it almost always traces back to contamination at the bond interface or incomplete polymerization. This guide from Beauty Zone Nail Supply breaks down how to prevent nail lifting with professional gels, from prep through post-application care.
Lifting rarely shows during application: a set can look flawless on day one and peel at the sidewalls by day five. That delay is why so many techs blame the product when the real culprit happened before the first bead was placed.
Prep Failures That Break Adhesion
The nail plate is a porous surface covered in oils, moisture, and dead tissue. Gel needs a dry, textured, contamination-free surface to grip. Skip a step and you're building on sand.
Common prep failures include:
- Failing to remove the natural shine completely with a 180-grit file
- Leaving cuticle tissue on the plate, especially in the lateral folds
- Skipping dehydrator and going straight to primer
- Touching the prepped plate with bare fingers before application
Lamp and Product Problems Most Techs Miss
Even perfect prep fails if the gel never fully cures. Weak lamps, aged bulbs, and mismatched systems leave uncured monomer at the base layer, which migrates outward and pops the enhancement loose.
Proper Nail Plate Preparation for Gel: Step-by-Step
Proper nail plate preparation for gel is a five-step sequence: shape, buff, remove cuticle, dehydrate, and prime. Skipping any step compromises the bond.
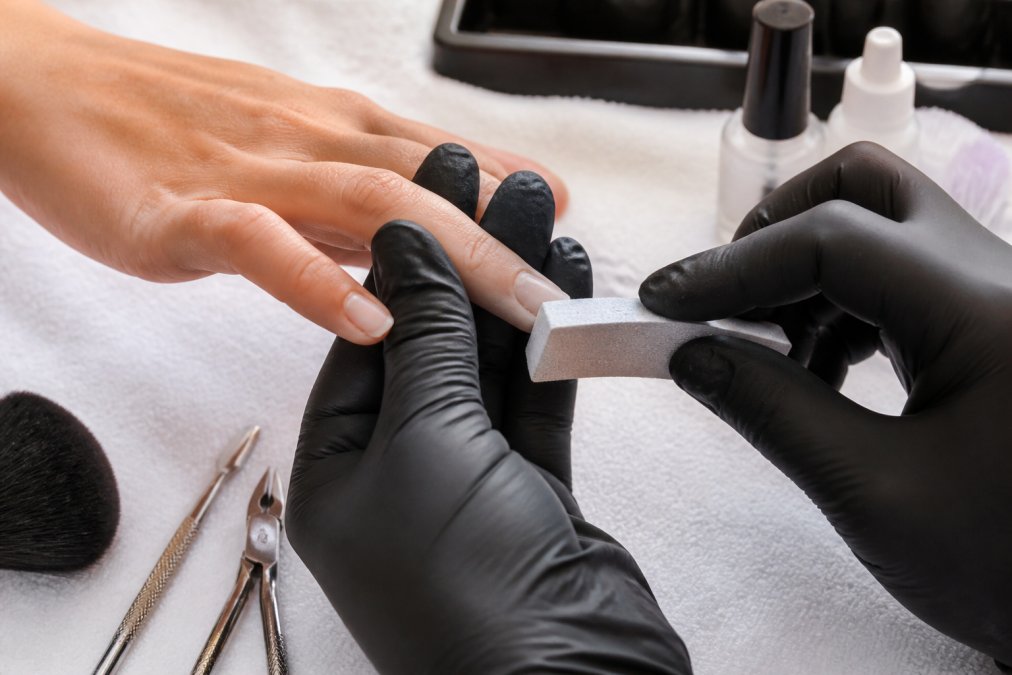
The sequence that holds up in practice:
- Sanitize and shape. Wash your hands and the client's, then file the free edge to shape with a 180-grit file. Don't over-file the sidewalls.
- Buff the plate. Use light, sweeping strokes with a 180-grit buffer to remove shine. You're creating texture, not thinning the nail. Stop when the surface looks matte.
- Remove cuticle tissue. Use a cuticle bit or nippers to clear the cuticle area and lateral folds. Any tissue left on the plate becomes a failure point.
- Dehydrate. Apply a dehydrator to remove surface moisture and oil residue. Let it flash off completely.
- Prime. Apply an acid-free primer or a bonding primer, depending on your system, and let it dry to a dull finish before applying base gel.
Dehydrating, Priming, and Capping the Free Edge
Dehydrator and primer do different jobs: dehydrator removes moisture and oil, while primer creates a chemical bridge between the plate and the gel. Using one without the other is a common mistake.
Capping the free edge is the step most techs rush. After applying base or builder, seal the tip by running the brush along the free edge to prevent pocket lifting, where moisture sneaks under the tip and travels inward.
Curing Time for Professional Builder Gel and UV/LED Lamps
Curing time for professional builder gel depends on the product's formulation and your lamp's output, not a universal number. Label times assume a lamp meeting the product's minimum wattage and wavelength, treat them as a floor, not a target.
Under-curing is one of the most underdiagnosed causes of lifting because the gel feels hard on the surface while remaining soft underneath. The base layer closest to the nail plate cures last, since light intensity drops as it passes through pigmented or thick gel. That uncured base releases unreacted monomer, which migrates toward the edges and pops the enhancement loose days later. Mastering the precise balance of light exposure and product application remains the most effective strategy for preventing gel nail lifting across all your future services.
Why Wattage and Wavelength Matter More Than Cure Time
UV/LED gels cure when a photoinitiator absorbs light at a specific wavelength and triggers polymerization. Most modern LED gels peak near 405 nm; some older UV gels respond closer to 365 nm (pubmed.ncbi.nlm.nih.gov). If your lamp's output doesn't overlap the product's absorption peak, you can run the timer twice and still leave the base layer under-cured.
Wattage is a proxy for intensity, not a guarantee. A 48-watt lamp with a degraded bulb array can deliver less usable light at the nail than a healthy 36-watt lamp (pubmed.ncbi.nlm.nih.gov). The number on the box describes the lamp when new, not the one on your desk after a year of daily use.
Bulb and Lamp Degradation: The Hidden Culprit
LED arrays and UV bulbs both lose output over time. LED chips dim gradually as they heat-cycle, and UV fluorescent bulbs lose output well before they visibly fail. A lamp that still turns on and feels warm is not proof that it's curing.
To check without a radiometer: cure a test bead of builder gel on a clear plastic tip or foil, then probe the underside with an orange wood stick. If the base is tacky, stringy, or soft while the top is hard, your lamp is under-curing the layer that matters most. Compare against a brand-new lamp of the same model.
Rules That Hold Across Most Systems
- Follow the manufacturer's cure time exactly, don't shorten it to save appointment time.
- Match your lamp's wavelength to the product's photoinitiator system. When in doubt, use the lamp the manufacturer sells for that line.
- Replace bulbs or the entire lamp on the schedule the manufacturer recommends, not when it stops working.
- Cure thin layers, not thick ones. Thick application blocks light penetration and leaves the base soft.
- Keep the client's hand flat and still inside the lamp. Tilting the hand or pulling it out early leaves the sidewalls and free edge under-cured.
- Cure the thumb separately. Most lamps don't position the thumb under the same intensity as the four fingers, and thumb lifting is a common pattern.
For a durable set, apply builder gel in thin, controlled layers and cure each fully. The apex and stress point need enough structure to resist flex, but not so much that light can't reach the base. If you switch product lines, re-test your cure time against your lamp, the photoinitiator chemistry may have changed.
Chemical Compatibility: Matching Primer, Base, and Builder Gel
Chemical compatibility is the single most overlooked cause of lifting. Mixing a primer from one line with a base from another can create a bond that fails at the interface, even when every step is executed correctly.
Each product in a gel system is formulated to work with the others: primers bond to specific base gel chemistries, and base gels accept specific builder viscosities. Break the chain and you introduce a weak link.
Here's how to think about system matching:
| Layer | Function | Compatibility Check |
|---|---|---|
| Dehydrator | Removes moisture and oil | Works with any system |
| Primer | Bonds plate to gel | Match to base gel chemistry |
| Base gel | Anchors the enhancement | Match to primer and builder |
| Builder gel | Provides structure | Match to base and top coat |
| Top coat | Seals and protects | Match to builder |
When in doubt, stay within one product line for the entire bond chain. A primer like No Lift Nails Primer .75 oz #1141 is formulated to work with acrylic systems, while a sensitive-nail option like TLG Primer Line Out Sensitive Nails 0.5 oz is designed to maximize adhesion on clients with reactive nail beds. Pair either with a compatible base such as DND Base Soak Off Gel 0.5 oz #500, which cures in 30 seconds under LED or two minutes under UV.


Nail Plate Health Assessment and Client Suitability
Not every client is a candidate for a long-wear gel enhancement. A plate that's thin, damaged, or excessively flexible will struggle to hold any enhancement, regardless of technique, so assess before you book.
Run through this quick assessment at the start of every new client appointment:
- Is the plate smooth, or does it show ridges, pits, or peeling?
- Does the nail bend easily under light pressure?
- Is there any sign of onycholysis, where the nail has separated from the nail bed?
- Are the surrounding tissues healthy, or is there redness or irritation?
- Has the client had recent trauma or surgery to the nail area?
If the plate is compromised, adjust your approach. A rubber base or flexible builder gel handles natural nail flex better than a rigid hard gel. For thin plates, consider a shorter extension and a lighter apex to reduce stress at the stress point.
Clients who work with their hands, swim regularly, or use cleaning chemicals need a frank conversation about realistic wear time. Flexibility is a feature, not a flaw: a gel that moves with the nail lasts longer than one that fights it.
Post-Application Maintenance to Stop Lifting
Post-application maintenance is where most lifting problems are actually solved, because the bond keeps changing after the client leaves the chair. The first 48 hours matter most: the gel is cured, but the interface is still equilibrating with the nail's moisture content (pubmed.ncbi.nlm.nih.gov). Nails swell when wet and shrink as they dry, stressing the bond every time the client washes their hands.
What Actually Breaks the Bond After the Service
Most post-service lifting traces to one of four exposures:
- Prolonged water immersion. Hot water and long soaks swell the nail plate faster than the gel can follow, and repeated swell-shrink cycles work the edge loose. Dishes, baths, and swimming are the usual suspects.
- Solvents and detergents. Acetone, household cleaners, and degreasers soften the gel's top layers and can wick under a lifted edge, accelerating the peel.
- Oils and lotions at the cuticle. Cuticle oil is good for the surrounding skin, but heavy application directly at the base of the enhancement can migrate under the edge and reduce adhesion over time.
- Mechanical flex and impact. Using nails as tools levers the free edge upward, and the stress concentrates at the sidewalls, exactly where pocket lifting starts.
Understanding the mechanism changes the advice: keep the nail plate's moisture swings small and keep solvents away from the edge.
Specific Aftercare Instructions to Give Every Client
- Keep nails dry for the first 24 hours. No long showers, no dishwashing without gloves, no soaking.
- Wear nitrile or rubber gloves for dishes, cleaning, gardening, and any chemical exposure, not just "when you remember."
- Apply cuticle oil to the skin around the nail, not directly onto the base of the enhancement. A drop per nail, massaged into the lateral folds and cuticle, is enough.
- Use a hand cream after washing, but wipe excess off the nail surface so it doesn't sit at the edge.
- Avoid using nails as tools to open cans, peel labels, or pry objects. Keep a keychain tool or a coin handy for those jobs.
- Book a fill appointment before the two-week mark to catch early lifting while it's still a small pocket.
Why the Fill Interval Matters More Than the Product
A fill isn't just cosmetic maintenance, it's a chance to inspect the bond line before small lifts become full-nail damage. Lifting caught at the first sign of a pocket can be filed out and re-bonded in minutes; left three or four weeks, it usually means full removal and a damaged plate underneath.
Clients should never pick or peel at home. Lifting that starts as a small pocket becomes a full nail of damage when pulled, because the gel takes a thin layer of natural nail with it every time. Repeated picking leads to long-term plate thinning and sensitivity.
Recommend a proper soak-off with acetone, then a surface cleanser to remove residue without over-drying the skin. A cleanser like Gelish Nail Surface Cleanse 32 Oz #01228 removes oils and dust after filing without leaving a film that interferes with the next application.
The bond doesn't stop curing when the client leaves, it keeps responding to water, solvents, and flex. Give clients specific exposures to avoid, not vague warnings, and the set will hold to the fill.
Conclusion
Preventing lifting comes down to discipline across the entire bond chain: clean prep, correct chemistry, full cure, and honest aftercare. Miss one and the others can't compensate.
At Beauty Zone Nail Supply, we stock the professional-grade primers, base gels, and cleansers that make a consistent bond chain possible. Our catalog is built for licensed professionals who need reliable products, and our overstock deals and monthly salon specials keep your supply costs predictable. Shop Now and build sets that hold from day one to fill day.
Frequently Asked Questions
How to avoid gel nail lifting?
Preventing nail lifting comes down to four things: thorough nail plate prep, removing all oil residue with a dehydrator, applying an acid-free primer, and curing each layer for the full recommended time. File the free edge gently, push back the cuticle area without cutting live tissue, and keep product off the skin. Using a fresh primer like No Lift Nails Primer ($11.00) and a base coat such as DND Base Soak Off Gel ($5.00) gives you a foundation that resists peeling and pocket lifting between appointments.
Why do my nails lift with builder gel?
Builder gel lifting usually traces back to three issues: insufficient curing time, an aging UV/LED lamp that no longer delivers full wattage, or product applied too thick near the stress point. If the inhibition layer feels tacky after curing, your lamp may be degrading. Check your lamp's bulb hours and replace when output drops. Also confirm your builder gel is compatible with your primer and base coat. Thin application at the apex and stress point reduces flex stress that causes lifting.
Does improper cuticle prep cause gel lifting?
Yes. Leaving cuticle tissue, oil, or moisture on the nail plate is one of the most common causes of gel nail lifting. The cuticle area traps oil that prevents adhesion, and any product that touches the skin will lift within days. Push back cuticles gently, use a fine-grit file to lightly buff the nail plate, then apply a dehydrator. An acid-free primer designed for sensitive nails, like TLG Primer Line Out ($6.00), maximizes adhesion without irritating the nail bed.
How does humidity affect professional gel application?
High humidity slows the evaporation of moisture from the nail plate and can interfere with primer and base coat adhesion. In humid conditions, spend extra time dehydrating the nail plate and allow primer to dry completely before applying base gel. Low humidity creates the opposite problem: the nail plate dries out, becomes brittle, and flexes more, which stresses the bond at the free edge. Adjusting your prep time and using a rubber base for flexibility helps in both extremes.